Dependency Diagrams Provide a Visual Method of Reviewing All the Relationships
This browser is no longer supported.
Upgrade to Microsoft Edge to take advantage of the latest features, security updates, and technical support.
Map dependencies with code maps
In this article, yous'll learn how to visualize dependencies across your code with code maps.
What are code maps?
In Visual Studio, code maps help you lot more quickly run into how your program code fits together without reading through files and lines of code. With these maps, you tin can run into the organization and relationships in your code, including its structure and its dependencies, how to update it, and estimate the cost of proposed changes.
Yous can map dependencies for code in these languages:
-
Visual C# or Visual Basic in a solution or assemblies (.dll or .exe)
-
Native or managed C or C++ code in Visual C++ projects, header files (.h or
#include), or binaries -
X++ projects and assemblies made from .Cyberspace modules for Microsoft Dynamics AX
Note
For projects other than C# or Visual Basic, at that place are fewer options for starting a lawmaking map or adding items to an existing code map. For example, you cannot correct-click an object in the text editor of a C++ project and add information technology to a code map. However, y'all can drag and driblet individual lawmaking elements or files from Solution Explorer, Class View, and Object Browser.
Prerequisites
To create a code map in Visual Studio, kickoff install the Lawmaking Map and Live Dependency Validation components
To create and edit code maps, yous need Visual Studio Enterprise edition. However, in Visual Studio Community and Professional person editions, y'all can open diagrams that were generated in Enterprise edition, but you cannot edit them.
Note
Before yous share maps created in Visual Studio Enterprise with others who use Visual Studio Professional, brand sure that all the items on the map (such as hidden items, expanded groups, and cross-group links) are visible.
Add together a lawmaking map
You lot can create an empty code map and drag items onto it, including assembly references, files and folders, or you lot tin can generate a code map for all or part of your solution.
To add an empty lawmaking map:
-
In Solution Explorer, open the shortcut menu for your top-level solution node. Choose Add together > New Item.
-
In the Add New Item dialog, under Installed, choose the Full general category.
-
Choose the Directed Graph Document(.dgml) template and then select Add together.
Tip
This template may not announced alphabetically, then roll downwards to the lesser of the template listing if you lot don't come across it.
A bare map appears in your solution's Solution Items folder.
Similarly, you can create a new code map file without calculation it to your solution by selecting Architecture > New Code Map or File > New > File.
Larn more:
- Share code maps
- Create code maps for C++
- Improve code map performance
Generate a lawmaking map for your solution
To see all the dependencies in your solution:
-
On the menu bar, cull Architecture > Generate Code Map for Solution. If your code hasn't changed since the last time you built it, you can select Architecture > Generate Lawmaking Map for Solution Without Building instead.
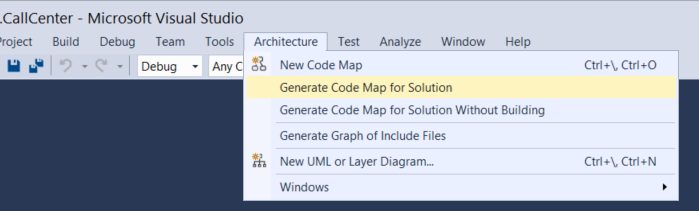
A map is generated that shows the tiptop-level assemblies and aggregated links between them. The wider the aggregate link, the more dependencies it represents.
-
Use the Fable button on the code map toolbar to prove or hide the list of project type icons (such equally Exam, Web, and Telephone Project), lawmaking items (such as Classes, Methods, and Properties), and relation types (such equally Inherits From, Implements, and Calls).
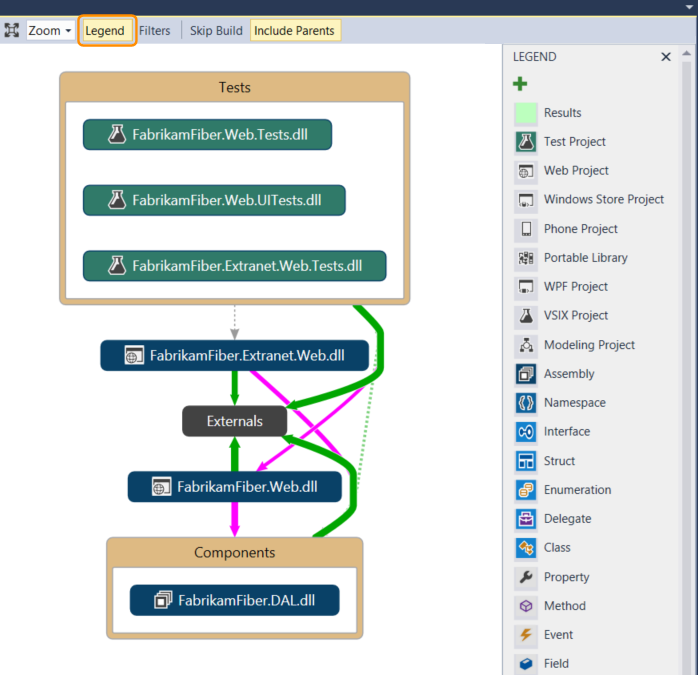
This case solution contains Solution Folders (Tests and Components), Test Projects, Web Projects, and assemblies. By default, all containment relationships appear equally groups, which you tin aggrandize and plummet. The Externals grouping contains anything exterior your solution, including platform dependencies. External assemblies show only those items that are used. By default, system base types are hidden on the map to reduce ataxia.
-
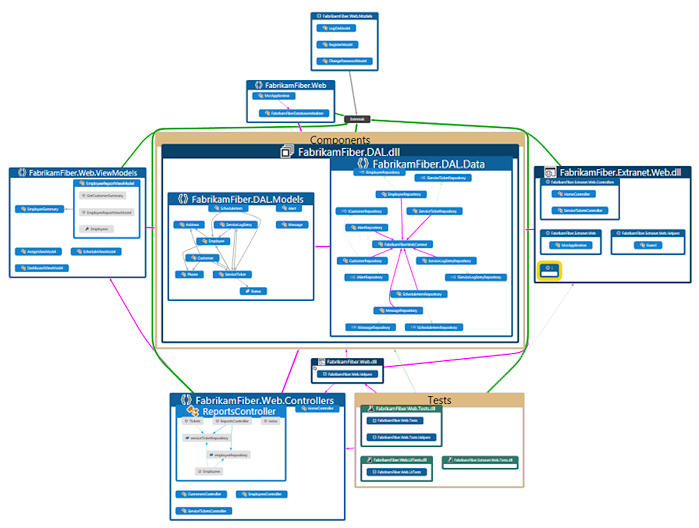
To drill down into the map, expand the groups that stand for projects and assemblies. You lot can expand everything by pressing CTRL+A to select all the nodes and then choosing Grouping, Expand from the shortcut card.
-
However, this may not be useful for a large solution. In fact, for complex solutions, memory limitations may foreclose you from expanding all the groups. Instead, to meet within an individual node, expand information technology. Motion your mouse pointer on meridian of the node and and then click the chevron (down arrow) when it appears.
Or use the keyboard past selecting the item and then pressing the plus central (+). To explore deeper levels of code, do the same for namespaces, types, and members.
-
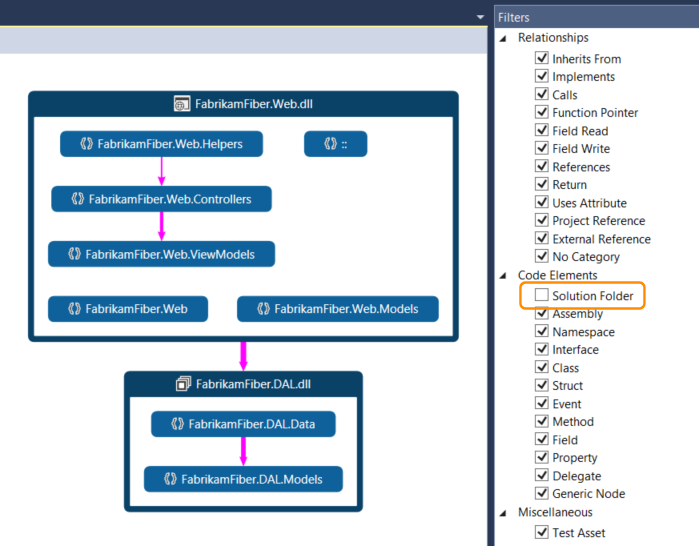
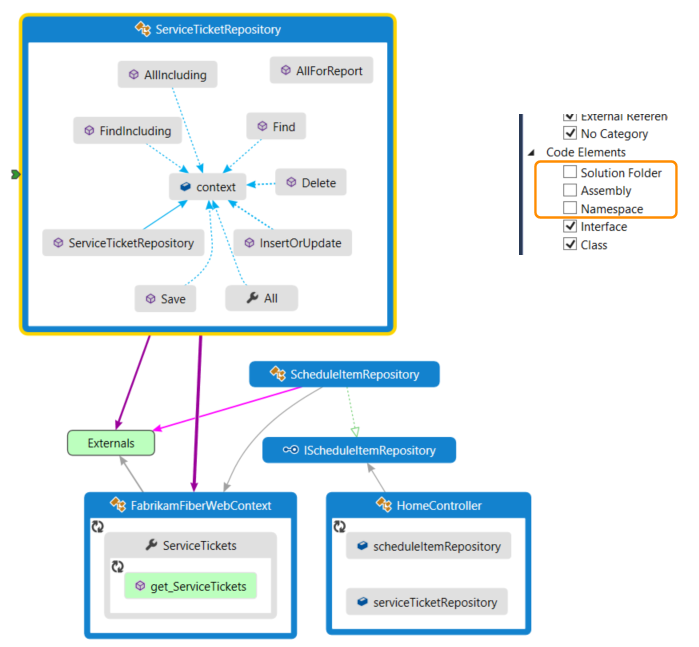
To simplify the map and focus on individual parts, choose Filters on the code map toolbar and select just the types of nodes and links you are interested in. For example, you can hide all the Solution Folder and Assembly containers.
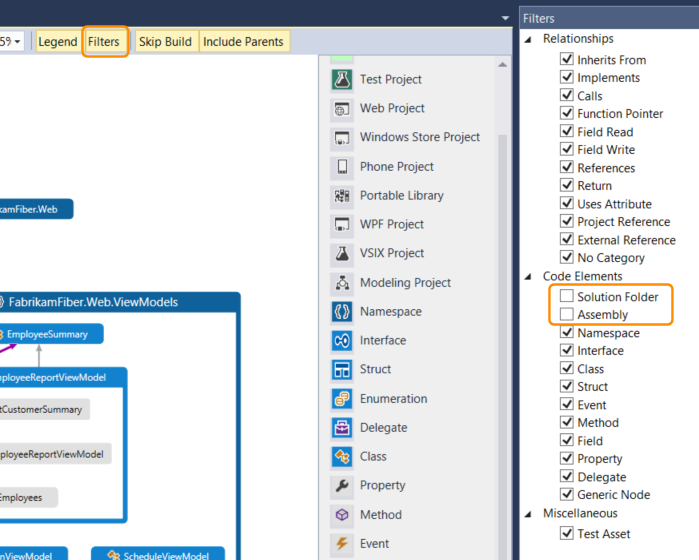
You can also simplify the map by hiding or removing individual groups and items from the map, without affecting the underlying solution code.
-
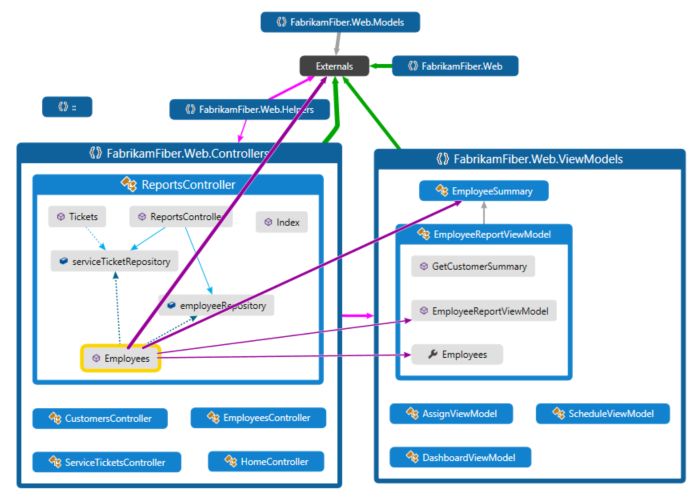
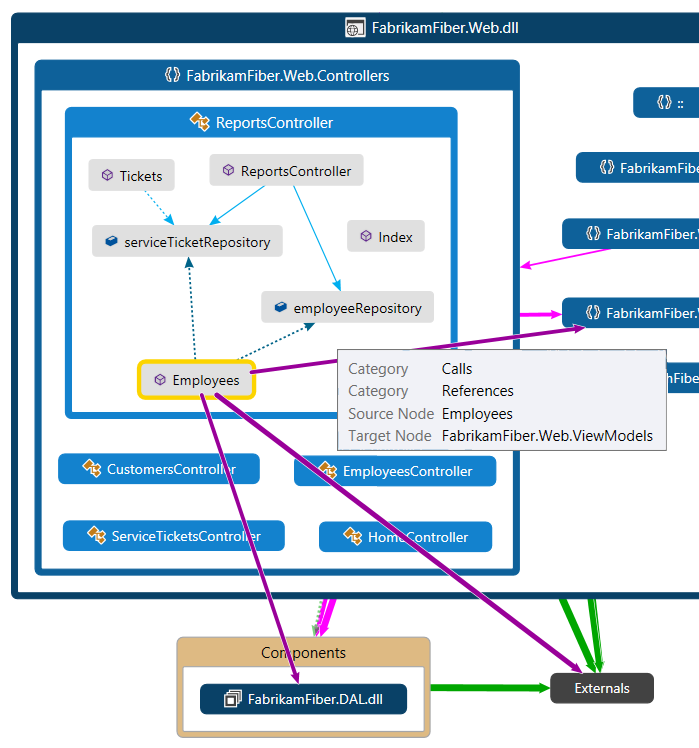
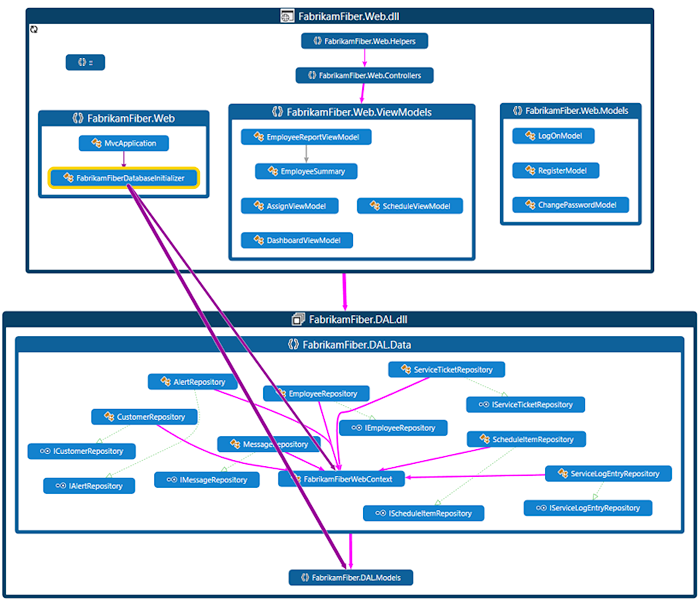
To come across the relationships between items, select them in the map. The colors of the links point the types of relationship, as shown in the Legend pane.
In this example, the purple links are calls, the dotted links are references, and the lite blue links are field access. Green links tin can be inheritance, or they may be aggregate links that betoken more than than one type of human relationship (or category).
Tip
If y'all see a green link, it might non hateful there'due south just an inheritance relationship. At that place might also be method calls, but these are hidden past the inheritance relationship. To see specific types of links, use the checkboxes in the Filters pane to hide the types yous aren't interested in.
-
To get more data about an detail or link, motion the arrow on top of information technology until a tooltip appears. This shows details of a code element or the categories that a link represents.
-
To examine items and dependencies represented by an aggregate link, first select the link and and so open its shortcut menu. Choose Show Contributing Links (or Testify Contributing Links on New Code Map). This expands the groups at both ends of the link and shows only those items and dependencies that participate in the link.
-
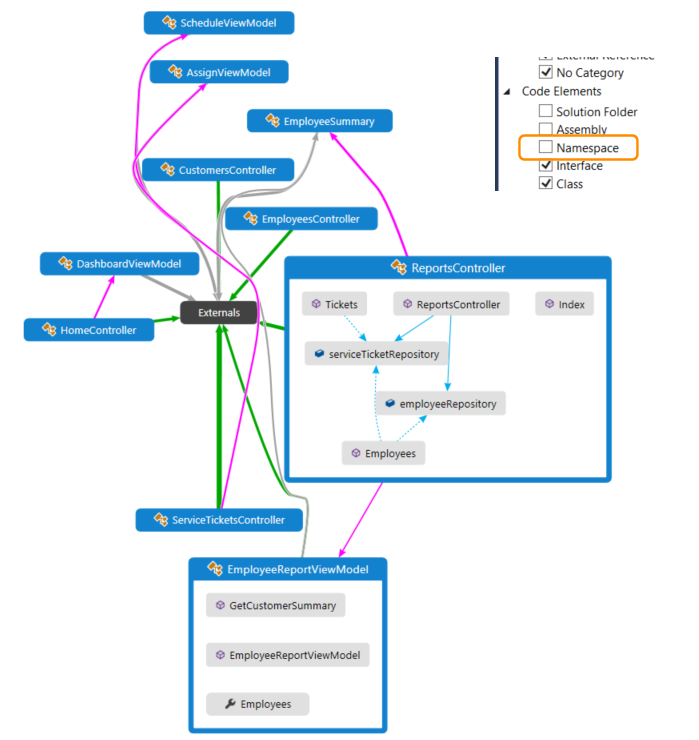
To focus in on specific parts of the map, you tin continue to remove items you aren't interested in. For example, to drill into class and member view, just filter all the namespace nodes in the Filters pane.
-
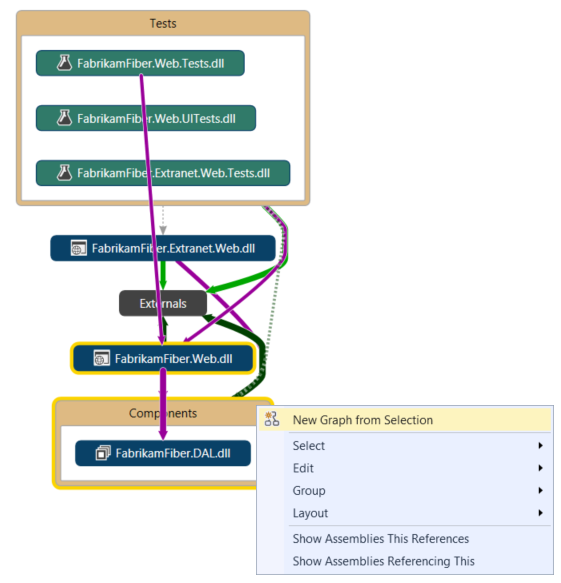
Some other way to focus in on a complex solution map is to generate a new map containing selected items from an existing map. Concord Ctrl while selecting the items you desire to focus on, open the shortcut menu, and choose New Graph from Option.
-
The containing context is carried over to the new map. Hide Solution Folders and any other containers you don't desire to see using the Filters pane.
-
Expand the groups and select items in the map to view the relationships.
Also see:
- Browse and rearrange code maps
- Customize code maps past editing the DGML files
- Discover potential problems in your code by running an analyzer
View dependencies
Suppose yous have a code review to perform in some files with pending changes. To see the dependencies in those changes, you can create a code map from those files.
-
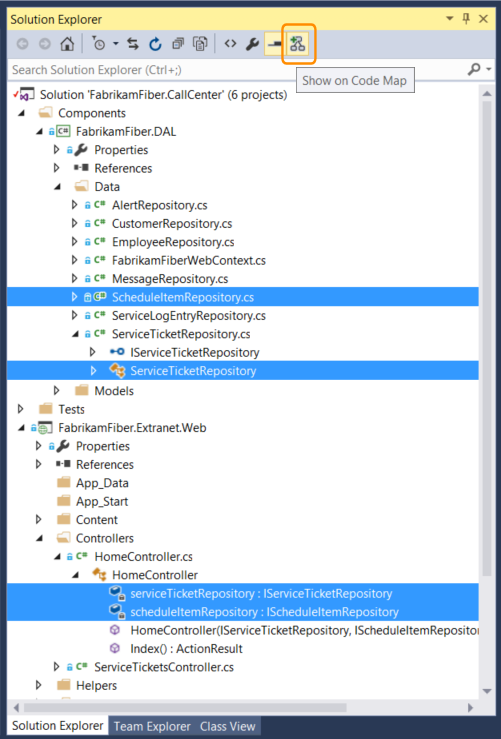
In Solution Explorer, select the projects, assembly references, folders, files, types, or members that yous desire to map.
-
On the Solution Explorer toolbar, choose Show on Code Map
 . Or, open up the shortcut carte for one or a grouping of items and choose Show on Code Map.
You can besides elevate items from Solution Explorer, Class View, or Object Browser, into a new or existing lawmaking map. To include the parent bureaucracy for your items, press and agree the Ctrl key while you drag items, or use the Include Parents button on the code map toolbar to specify the default action. You can too elevate assembly files from exterior Visual Studio, such as from Windows Explorer.
Note
When you add items from a project that'southward shared across multiple apps, similar Windows Phone or Microsoft Shop, those items announced on the map with the currently active app project. If you change context to another app project and add more than items from the shared project, those items now appear with the newly active app projection. Operations that you perform with an detail on the map utilize only to those items that share the same context.
-
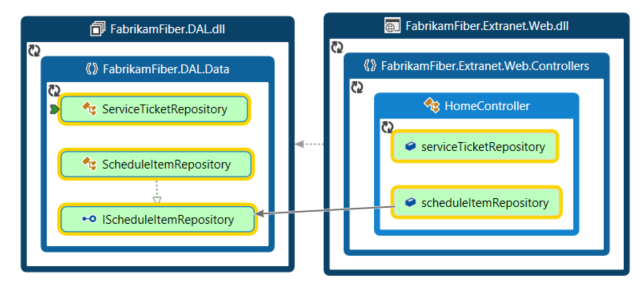
The map shows the selected items within their containing assemblies.
-
To explore items, expand them. Movement the mouse arrow on top of an item, so click the chevron (down arrow) icon when it appears.
To expand all items, select them using Ctrl+A, then open the shortcut menu for the map and choose Group > Aggrandize. However, this option isn't available if expanding all groups creates an unusable map or memory issues.
-
Continue to expand items you are interested in, right down to the class and member level if necessary.
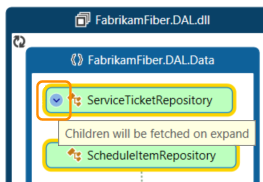
To see members that are in the lawmaking only don't appear on the map, click the Refetch Children icon
 in the tiptop left corner of a grouping.
 -
To meet more items related to those on the map, select 1 and choose Show Related on the code map toolbar, and then select the type of related items to add to the map. Alternatively, select one or more items, open the shortcut menu, and then choose the Testify choice for the type of related items to add to the map. For example:
For an associates, choose:
Selection Description Bear witness Assemblies This References Add together assemblies that this assembly references. External assemblies appear in the Externals grouping. Show Assemblies Referencing This Add assemblies in the solution that reference this assembly. For a namespace, choose Show Containing Assembly, if it's non visible.
For a grade or interface, choose:
Option Description Show Base Types For a class, add the base of operations class and the implemented interfaces. For an interface, add together the base interfaces.
Show Derived Types For a form, add together the derived classes. For an interface, add together the derived interfaces and the implementing classes or structs.
Prove Types This References Add together all classes and their members that this class uses. Bear witness Types Referencing This Add all classes and their members that employ this class. Show Containing Namespace Add the parent namespace. Show Containing Namespace and Associates Add the parent container bureaucracy. Prove All Base of operations Types Add the base class or interface bureaucracy recursively. Show All Derived Types For a form, add all the derived classes recursively. For an interface, add all the derived interfaces and implementing classes or structs recursively.
For a method, choose:
Option Clarification Show Methods This Calls Add methods that this method calls. Show Fields This References Add fields that this method references. Show Containing Type Add the parent type. Show Containing Blazon, Namespace, and Assembly Add the parent container bureaucracy. Prove Overridden Methods For a method that overrides other methods or implements an interface'due south method, add all the abstruse or virtual methods in base classes that are overridden and, if any, the interface's method that is implemented. For a field or property, choose:
Option Description Testify Containing Blazon Add the parent type. Show Containing Type, Namespace, and Assembly Add the parent container hierarchy. 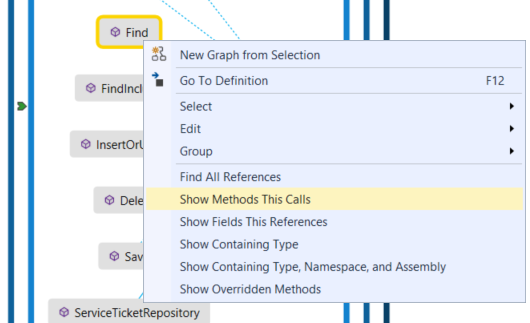
-
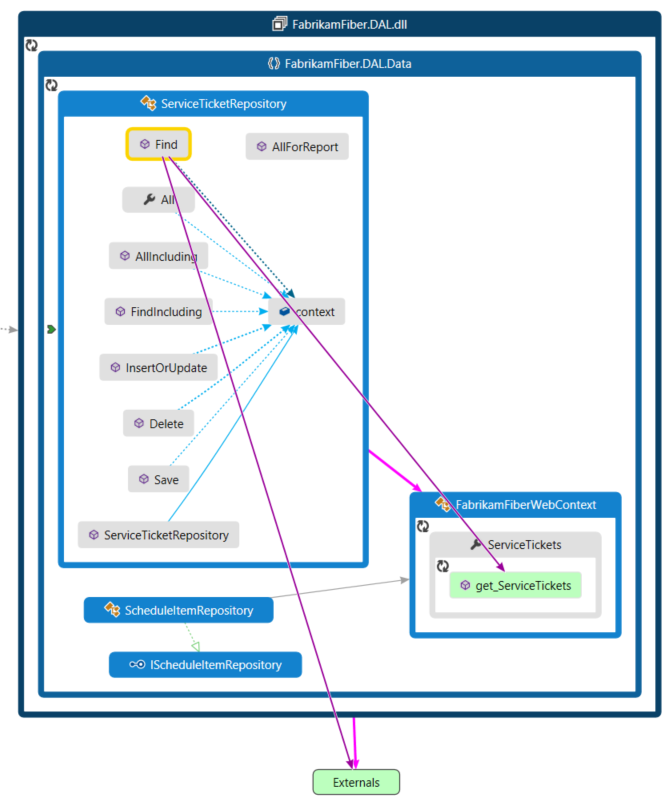
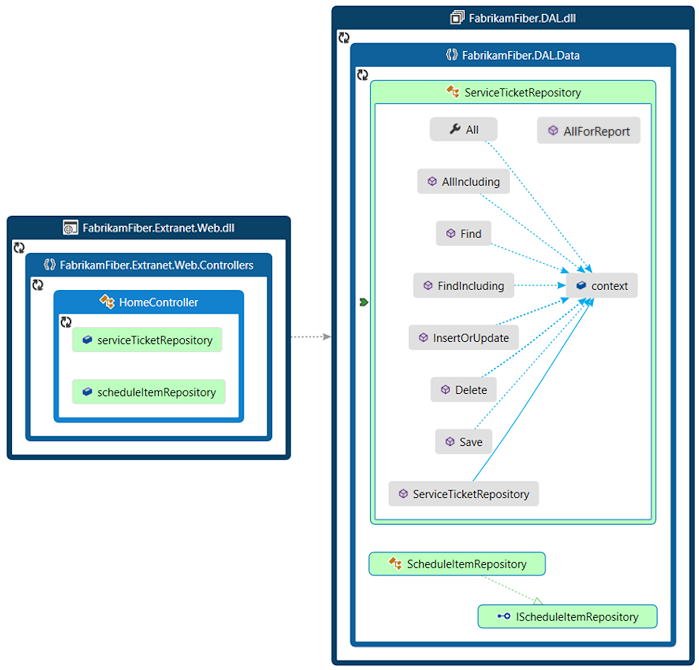
The map shows the relationships. In this instance, the map shows the methods called by the
Discovermethod and their location in the solution or externally. -
To simplify the map and focus on individual parts, choose Filters on the code map toolbar and select only the types of nodes and links you are interested in. For example, turn off display of Solution Folders, Assemblies, and Namespaces.
Encounter also
- Share lawmaking maps
- Create code maps for C++
- Ameliorate lawmaking map performance
- Utilize code maps to debug your applications
- Map methods on the call stack while debugging
- Find potential problems using code map analyzers
- Browse and rearrange code maps
- Customize lawmaking maps by editing the DGML files
Feedback
Submit and view feedback for
Source: https://docs.microsoft.com/en-us/visualstudio/modeling/map-dependencies-across-your-solutions
Post a Comment for "Dependency Diagrams Provide a Visual Method of Reviewing All the Relationships"